Experience
I ended up having to install the server 3 times. This was mainly do to user error and from trying to force it to use https. I tried both NGINX and Apache and stuck with Apache.
After changing the permalinks I was getting 404 errors. The site status was saying the the was an issue with the rest API. Everything I could find just mentioned the .htaccess file and to make sure it was being updated. Nothing was working until I finally found a post mentioning the apache2.conf that needed to be edited.
https://wordpress.org/support/topic/permalinks-change-breaks-all-links/#post-11198083
UPDATE FIXED!
I finally after digging around realized the .htaccess file was not being looked at after adding the rewrite rules. I only noticed when I tried to modify my rules and it showed no changes to the site.
What I found is the apache2.conf file did not have the AllowOveride directive set to ‘All’. It was set to ‘None’ which overlooks all .htaccess files. once I set that and restarted Apache then the .htaccess file was being read and the rewrite rules all work now. Hope this helps someone else.
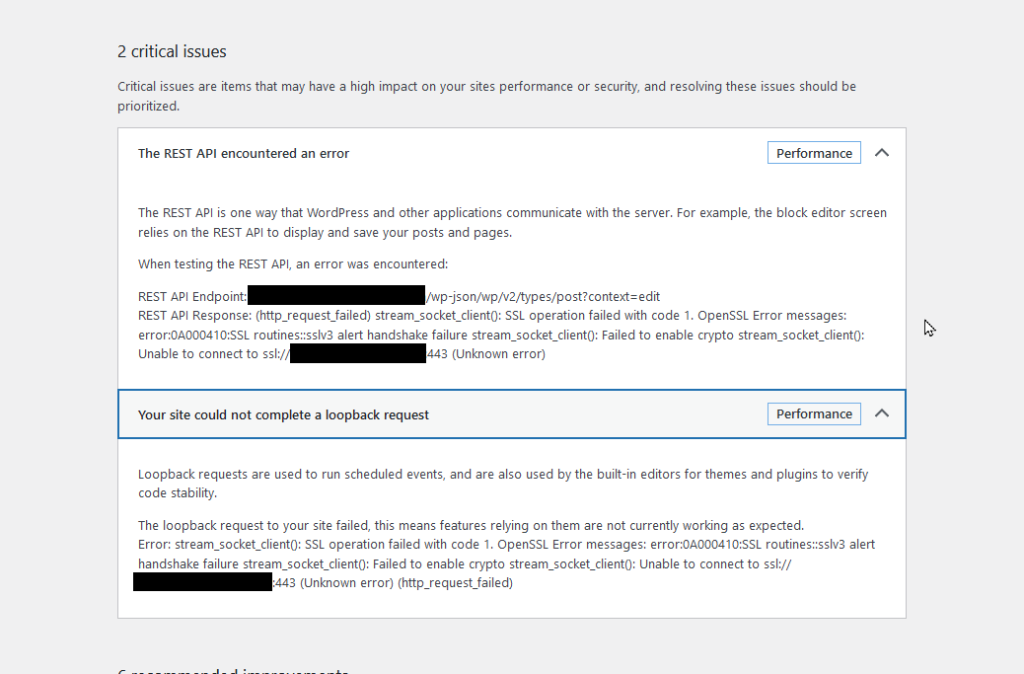
After the install I had 2 “Critical Issues” with the server shown below in the screenshot. I couldn’t find anything specific about this error. Some info mentioned that it might be the certs I used for my site. As everything was accessible from the outside I didn’t think it was the certs. Post were suggesting to test it by curling your site from the server to see if there were any errors. I was not getting any errors, but that made me check if there was an extension for curl for php. After I installed the extension the errors cleared.
Installation
Server Used: Ubuntu Server 24.04.2 LTS
Login as Root
sudo -sInstall Apache2 Webserver
apt install apache2 -y
systemctl status apache2
Install MariaDB SQL Server. You will need to answer some questions during the install.
apt install mariadb-server mariadb-client -y
mysql_secure_installation
Install PHP
apt install php php-mysql -yConfigure MariaDB. The first command will connect the MariaDB and the next 5 lines are SQL commands and are case sensitive. You will need to change User and Password were they appear on each line. They are bold in the code below.
mysql -u root -p
CREATE DATABASE wordpress_db;
CREATE USER'User'@'localhost' IDENTIFIED BY 'Password';
GRANT ALL ON wordpress_db.* TO 'User'@'localhost' IDENTIFIED BY 'Password';
FLUSH PRIVILEGES;
Exit;
Download the latest WordPress files to tmp. You will need to replace Domain with the domain you own. They are bold in the code below.
cd /tmp && wget https://wordpress.org/latest.tar.gz
tar -xvf latest.tar.gz
cp -R wordpress /var/www/
mv /var/www/wordpress /var/www/Domain
mkdir /var/www/Domain/wp-content/uploads
chown -R www-data:www-data /var/www/Domain/wp-content/uploads/
chown -R $USER:$USER /var/www/Domain/
Open the config for your site. Change domain to the domain you entered in the last section. This is bold in the code below.
nano /etc/apache2/sites-available/Domain.confAdd the following code in this file. Exit by hitting CTRL + X then Y and hit Enter to save the file. Change domain to the domain you entered in the last section. They are bold in the code below.
<VirtualHost *.80>
        ServerName Domain
        ServerAlias www.Domain
        ServerAdmin webmaster@localhost
        DocumentRoot /var/www/Domain
        ErrorLog ${APACHE_LOG_DIR}/error.log
        CustomLog ${APACHE_LOG_DIR}/access.log combined
</VirtualHost>
We are going to enable your site and disable the default site. We will reload Apache2 after this.
chown -R www-data:www-data /var/www/Domain/
chmod -R 755 /var/www/Domain/
a2ensite Domain
a2dissite 000-default
systemctl reload apache2
Optional – If you want to enable SSL and generate your own certs. Install and run Certbot. You will need to have a domain is pointed to IP address of the server.
apt install certbot python3-certbot-apache
certbot --apache